Export data in Word, Excel or PDF format using Visualforce

Visualforce Page

<apex:page controller="AccountFilterctr" renderAs="{!renderAsdoc}"  contentType="{!renderAsExcel}" sidebar="false">

      <Apex:form >  
          <Apex:pageBlock Title="Account" id="pb1" rendered="{!pb1}" >
          
          <style>
           .rg1 {background-color: lightblue; color:black; background-image:none}
           .rg2 {background-color: white; color:black; background-image:none}
           .SelectlistStyle {background-color: lightblue; color:black; font-size: 100%; background-image:none}
           .myClass{
                color:white !important;
                background: #66b3ff !important;
                }
        </style>  
              <Apex:commandButton value="Export as Pdf" action="{!SaveAspdf}" StyleClass="myClass"/>
              <Apex:commandButton value="Export as Excel" action="{!SaveAsExcel}" StyleClass="myClass"/>
              <Apex:commandButton value="Export as Word" action="{!SaveAsWord}" StyleClass="myClass" />
          </Apex:pageBlock>
 
          <Apex:pageBlock >
            <!--Account Table -->
               <apex:outputPanel id="acctTable">
                      <apex:PageblockTable value="{!acct}" var="acc" border="1" cellpadding="2" cellspacing="1" rowClasses="rg1,rg2">
                      
                          <apex:column value="{!acc.Name}">
                          <apex:facet name="header">Account Name</apex:facet>
                          </apex:column>
                          
                          <apex:column value="{!acc.BillingCountry}">
                          <apex:facet name="header">Billing Country</apex:facet>
                          </apex:column>
                          
                          <apex:column value="{!acc.BillingState}">
                          <apex:facet name="header">Billing State</apex:facet>
                          </apex:column>
                          
                          <apex:column value="{!acc.BillingCity }">
                          <apex:facet name="header">Billing City</apex:facet>
                          </apex:column>
                          
                      </apex:PageBlocktable>
                      </apex:outputPanel>
                
          </Apex:pageBlock>
                  
      </Apex:form>

</apex:page>

Apex class

public class AccountFilterctr 
{
    public List<Account> acct{get;set;}
    public string renderAsdoc{get;set;}
    public boolean pb1{get;set;}
    public string renderAsExcel{get;set;}

    public AccountFilterctr()
    {
        acct=[Select Name,BillingCountry,BillingState,BillingCity from Account];
        pb1=true;
    }
    
    //pdf generate
    public PageReference SaveAspdf() {
        pb1=false;
        renderAsdoc='pdf';
        //setup a default file name
        string fileName = 'Account Report Country State City '+date.today()+'.pdf';
        Apexpages.currentPage().getHeaders().put('content-disposition', 'attachemnt; filename='+fileName);
        return null;
    }

    //Save as Excel
    public PageReference SaveAsExcel() {
        pb1=false;
        renderAsExcel='application/vnd.ms-excel#Account Report.xls';
        return null;
    }
    
    // Save as word 
    public PageReference SaveAsWord() {
         pb1=false;
        renderAsExcel='application/vnd.ms-word#Account Report.doc';
        return null;
    }

}


Cheers!!!

actionstatus in Visualforce or Popup "Spinner".


Action status is usually used to show the status of an Ajax Process to which it is related to. It can be as simple as showing text during the update the page and showing a loading gif.

<apex:page controller="AccountFiltctr">
  <apex:actionStatus id="ProgStatusId" rendered="{!actionstatusrendered}">
             <apex:facet name="start">
             <div class="waitingSearchDiv" id="el_loading" style="background-color: #fbfbfb;height: 100%;opacity:0.65;width:100%;"> 
             <div class="waitingHolder" style="top: 74.2px; width: 91px;">
             <img class="waitingImage" src="/img/loading.gif" title="Please Wait..." />
             <span class="waitingDescription">Please Wait...</span>
             </div>
             </div>
             </apex:facet>                           

           </apex:actionStatus>
<apex:form id="frm">
    <apex:commandButton value="Test" status="ProgStatusId" reRender="pb1"/>
</apex:form>
</apex:page>


Cheers!!!


Page Block Table With Dynamic Columns In Salesforce


Visualforce Page

<apex:page controller="DynamicSoqlExApplikonctr">
  <apex:form >
      <apex:pageBlock >
          <Apex:pageBlockSection columns="1">
          
              <Apex:pageBlockSectionItem >                
                  Object Name
                  <Apex:selectList Size="1" multiselect="false" value="{!selectedObject}">
                      <apex:selectOptions value="{!ObjectName}" ></apex:selectOptions>
                      <apex:actionSupport event="onchange" reRender="pb1"/>
                  </Apex:selectList>
              </Apex:pageBlockSectionItem>
         
              <Apex:pageBlockSectionItem >
                <apex:outputPanel id="pb1">
                
                    Field Name 
                      <Apex:selectList Size="5" multiselect="True" value="{!selectedfield}">
                          <apex:selectOptions value="{!ObjectField}"></apex:selectOptions>
                      </Apex:selectList>
                      
                 </apex:outputPanel>
              </Apex:pageBlockSectionItem>
               
            </Apex:pageBlockSection>
              <CENTER><apex:commandButton value="Make table" action="{!MakeDynamicSOQLQuery}"/></CENTER>
            <Apex:pageBlockSection >
        
            <Apex:pageBlockSectionItem >
                  Dynamic Query:
                 <apex:inputTextarea rows="10" cols="60" value="{!temp1}"/>
                 
              </Apex:pageBlockSectionItem>   
          </Apex:pageBlockSection> 
         
          <apex:pageblockTable value="{!temp3}" var="t" rendered="{!IF(temp3.Size>0,true,false)}" >
              <Apex:repeat value="{!selectedfield}" var="s" >
                  <Apex:column value="{!t[s]}" />
              </apex:repeat>
          </apex:pageblockTable>
      
      </apex:pageBlock>
  </apex:form>

</apex:page>

Apex class

/*
@Author - Nitesh Kumawat
Date - 25 july 2016

Requirement -
1. Select Object Name through picklist
2. automatically related field shown in  another picklist
then make dynamic soql query
3. and then show table
*/
public class DynamicSoqlExApplikonctr 
{

    public Map<string,Schema.SObjectType>            SchemaMap=Schema.getGlobalDescribe(); 
    public string temp1{get;set;}
    public list<SObject> temp3{get;set;}
    public String selectedObject{get;set;}
    public List<string> selectedfield{get;set;}
    public DynamicSoqlExApplikonctr()
    {
        System.debug('@@SchemaMap-->'+SchemaMap);
        selectedObject='none';
        selectedfield=new list<String>();
        system.debug('@@temp3'+temp3);
        temp3=new list<SObject>();
    }
    
    //Object Name
    public List<SelectOption> getObjectName()
    {
        List<SelectOption> objName=new List<SelectOption>();
        List<String> schemaMapKeyList=new List<String>(SchemaMap.keySet());
        system.debug('@@selectedObject-->'+selectedObject);
        
         objName.add(new SelectOption('none','none'));
        for(String name:schemaMapKeyList)
        {
            objName.add(new SelectOption(name,name));
        }
        return objName;
    }
    
    //Field Name
    public List<SelectOption> getObjectField()
    {
      List<SelectOption> objField=new List<SelectOption>();
        if(selectedObject!='none')
        {
      
        Schema.SObjectType selectObj=SchemaMap.get(selectedObject);
        Map<string,Schema.SObjectField> SelectedObjectField=selectObj.getDescribe().fields.getMap();
        system.debug('@@SelectedObjectField-->'+SelectedObjectField);
        
        for(string fieldName:SelectedObjectField.keySet())
        {
            objField.add(new SelectOption(fieldName,fieldName));
        }
                   
        }
            return objField;     
    }
    
    //Page Table 
    public void MakeDynamicSOQLQuery() {
       
        system.debug('@@SelectedObject-->'+selectedObject);
        system.debug('@@Selectedfield-->'+selectedfield);
        temp1='Select ';
        for(String s:selectedfield )
        {
            if(s!=selectedfield.get(selectedfield.Size()-1))
            {
                temp1+=s+','+' ';
            }
            else
            {
                temp1+=s+' ';
            }
        }
        
        temp1+=' from '+selectedObject;
        temp3=database.query(temp1);

    }

}

Fieldset with Apex code

Fieldset apex code salesforce

A field set is a grouping of fields for same object. We can use dynamic bindings to display field sets on our Visualforce pages. Fieldset is very useful when we are working with managed package.
If we are using standard controller, then using fieldset in visualforce is straight forward. You can view my previous fieldset with visualforce page for using fieldset in visualforce pages.
But if we are using custom controller or extension, then we may need to query fieldset fields in SOQL query. So we will use dynamic SOQL query for querying all fields of fieldset.
By using dynamic SOQL query in Apex and using fielset in visualforce and Apex code. Our code will become dynamic, then we can add, remover or reorder fields in fieldset. By doing so, our code will become dynamic. There is no need to modify code when we will do any change in fieldset.
In the example below, we will use fieldset to display account list on visualforce page. We will use dynamic SOQL query in Apex code.
First we need to create a fieldset. Go to Setup > Customize > Accounts > Field Set
Click on new. Enter all mandatory fields. Also drag and drop all required fields in fieldset.

Visualforce Page
<apex:page controller="fieldsetcontroller" >
  <Apex:form >
     <apex:pageBlock >

          <apex:pageBlockSection title="Account" collapsible="false">
             <apex:pageBlockTable value="{!accList}" var="acc">
                 <apex:repeat value="{!$ObjectType.Account.fieldsets.AccountField}" var="fieldValue">
                     <apex:column value="{!acc[fieldValue]}">
                     </apex:column>
                 </apex:repeat>
             </apex:pageBlockTable>
          </apex:pageBlockSection>

          <apex:pageBlockSection title="Account Dynamic query" collapsible="false">
              <apex:outputText value="Query is: {!queryString}" />
          </apex:pageBlockSection>
      </apex:pageBlock>
     </apex:form>    
</apex:page>

Apex class
public class fieldsetcontroller 
{
    public String queryString{get;set;}
    public List<Account> accList{get;set;}
    public fieldsetcontroller ()
    {
        queryString = 'select id';
        for(Schema.FieldSetMember fld :SObjectType.Account.FieldSets.AccountField.getFields()) {
         queryString += ', ' + fld.getFieldPath();
        }
        System.debug('@@queryString-->'+queryString);
        queryString += ' from Account limit 5';
         
        acclist = Database.query(queryString);
    }
}
We will get following output in visualforce page:

FieldSet with Visualforce Page

You can use dynamic bindings to display field sets on your Visualforce pages. A field set is a grouping of fields.

Scenario is, suppose we want to display field on visualforce page through standard controller.
Simply we have to write code for that like 
<apex:inputfield value="{!Account.Name}"/>
but here we have to made a functionality - user can add and remove or reorder field anytime. it automatically add in visualforce Page. This can be achieve by "Dynamic Visualforce Binding and field set"
In the example below, we will display one fieldset for account object then we will display fieldset fields on visualforce page.

First we need to create a fieldset. Go to Setup > Customize > Accounts > Field Set
Click on new. Enter all mandatory fields. Also drag and drop all required fields in fieldset.


FieldSet Name - Accountfield

Now we will create visualforce code which will use fieldset.
Visualforce Code:

<apex:page standardController="Account">
    <Apex:form >
     <apex:pageBlock >
        <Apex:pageBlockSection title="Account" collapsible="false">
                <Apex:inputField value="{!Account.Name}"/>
                <apex:repeat value="{!$ObjectType.Account.FieldSets.AccountField}" var="f">
                        <apex:inputfield value="{!Account[f]}" /><br/>
                </apex:repeat>
        </Apex:pageBlockSection>
       </apex:pageBlock>
     </apex:form>
</apex:page>


We can add, remove, or reorder fields in a fieldset to modify the fields presented on the Visualforce page without modifying visualforce page code.
We will get following output in visualforce page:


Note:  You can have up to 50 field sets referenced on a single page.

Getting Started with Process Builder – Part 1 (Auto Create a record)

Idea
The purpose of this article is to discuss about Process builder. Process builder is generally available for use, after Spring’15 release. From today onwards I am going to start a series of blog post on Process builder, I will try to post at-least one article per week related to it.
What is Process Builder ?
Process builder is a combination of Flow and Workflow rule. In other word we can say that it’s a next level of Workflow rule, that allows us to automate your business process by creating Processes with point-and-click.
How to enable Process builder ?
Process builder is only available in Enterprise, Unlimited, Performance and Developer editions. After Spring’15 release it will generally available for above mentioned editions.
Why Process builder?
Workflow rule has a few limitations like using WFR you can’t create child record, Post to Chatter or Auto submit record in Approval process. Let’s start with a business use case
Business Use case :-  Corey Eridon is working as System administrator in Universal Container. She receives a requirement to auto create a child case whenever a new case is created with Case Reason Breakdown.
Solution of above business requirement
To solve this requirement, we will use Process BuilderWhenever we create a Process using Process builder Salesforce auto create a Flow and Workflow rule (With an action) to fire it. At the end of this article I will show you how to view Flow and Workflow action created by System for Process. Follow the below instructions to create a Process for the above business requirement
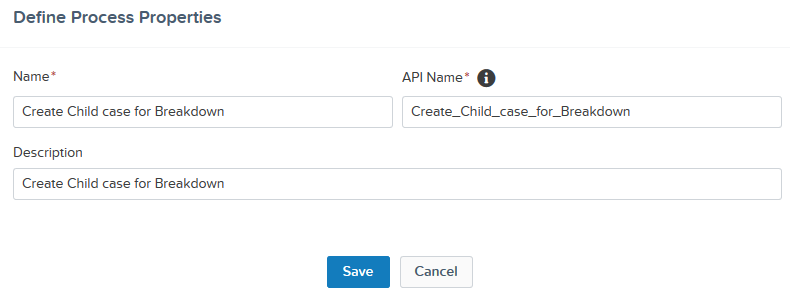
1. Click on Name | Setup | App Setup | Create | Workflows & Approvals | Process Builder2. To create a new process from scratch, click on the New Button available on Process management page, A popup will open where you have to enter Name (Enter Create_Child_case_for_Breakdown as name)API Name and Description as shown in the below screenshot
Define Process Properties
DEFINE PROCESS PROPERTIES
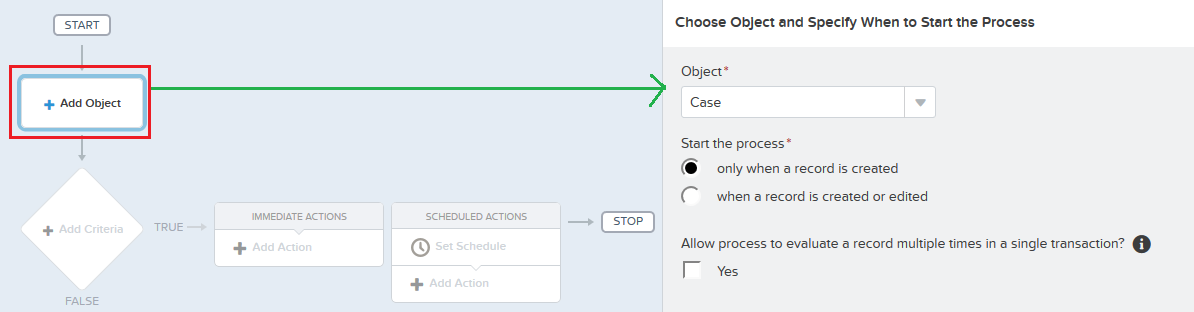
3. Once you are click on the Save button, it will redirect you to Process canvas. Click onObject node to add object and set the evaluation criteria, Please refer to the following screenshot for more details
Evaluation criteria
EVALUATION CRITERIA
4. The next step is to define Process criteria. For this click on Add Criteria node, enterCriteria NameSet filter conditions (Similar to Rule Criteria in WFR), as shown in the following screenshot
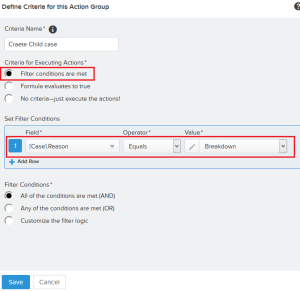
Process Criteria
PROCESS CRITERIA
5. Now we have to add an Immediate action into the Process to create a case record.For this use Create a Record action, Please refer to the following screenshot for more details
Add action - Create a Record
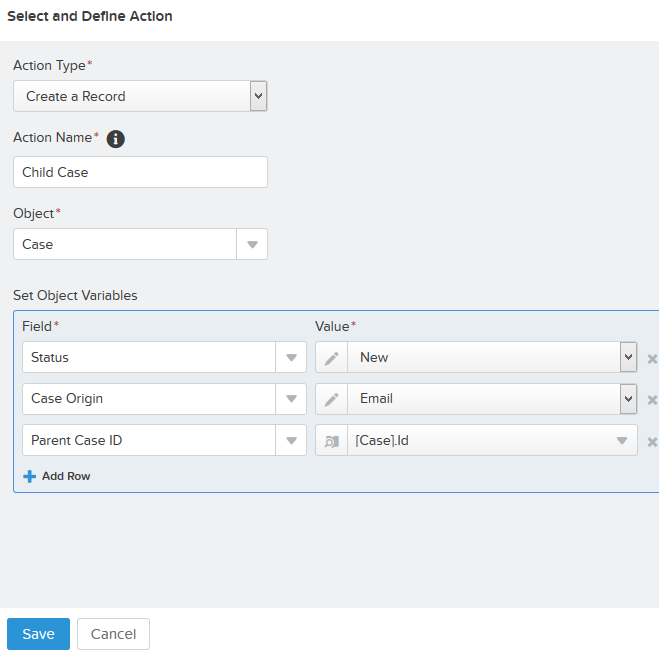
ADD ACTION – CREATE A RECORD
Make sure that you have assigned data in the correct format, because Process builderobey Validation rule. If some fields are required by using Validation rule, then make sure than you have added those fields. Same time if some fields are required using Page layout, you can ignore those fields.
6. Final task is to activate your Process by clicking on the Activate button.
Now onwards if you create a case with Case Reason Breakdown, Process will auto create a child case for it.
Flow and Workflow action created by Process builder
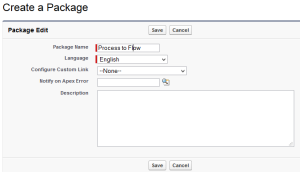
1. There are two ways that I am aware of, to see the Flow generated by Process Builder for current Process, those are Package or Change Sets. Now I am going to create a package, don’t worry it is very easy. Follow the path to create a Package
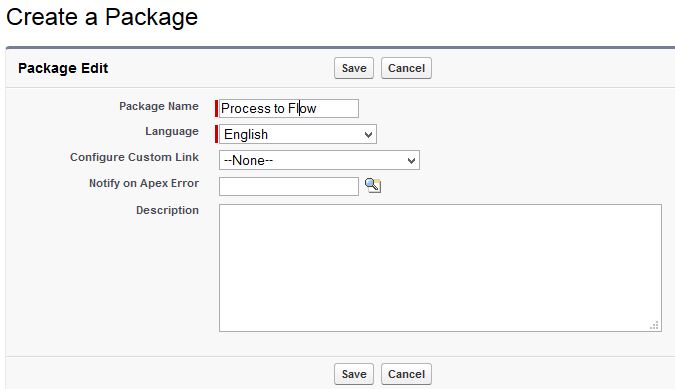
2. Click on Setup | Build | Create | Packages and click on the New button, enter thePackage Name, as shown in the following screenshot
Create a new Package
CREATE A NEW PACKAGE
3. Click on the Add button available under Component, as shown in the following screenshot
Add Components to Package
ADD COMPONENTS TO PACKAGE
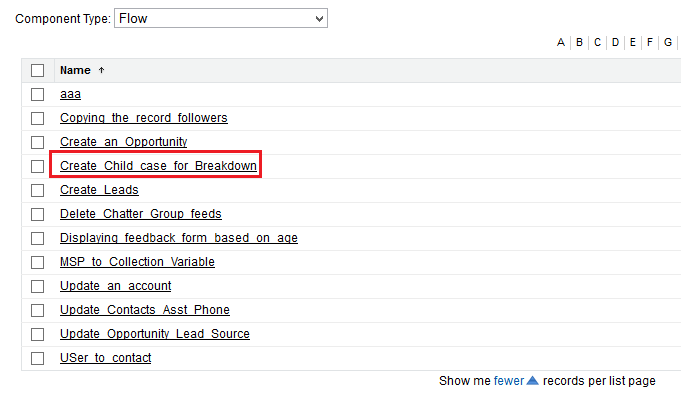
4. From Component Type drop-down select Flow, and click on the Process we have created, i.e. Create_Child_case_for_Breakdown as shown in the following
List of active Flows and Processes
LIST OF ACTIVE FLOWS AND PROCESSES
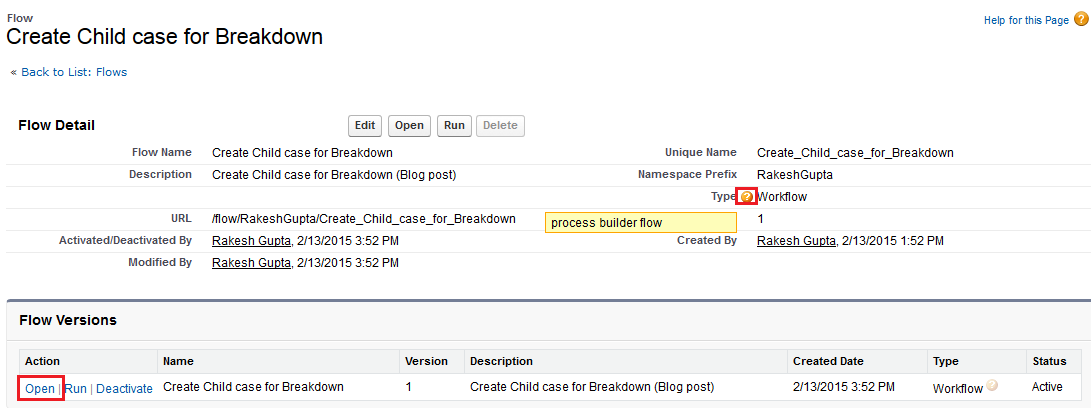
5. It will redirect you to the Flow detail page, see the Type i.e. Workflow different from normal (Flow or Autolaunched Flow). Now click on the Open link as shown in the following screenshot
Flow Created by Process builder
FLOW CREATED BY PROCESS BUILDER
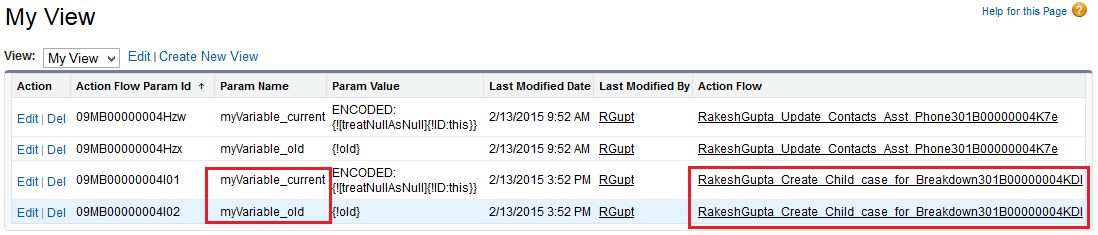
6. It will open the Flow, which is generated by Process Builder for the Process we have created. There are two SObject Variables created by Process to pass old and New Id of record to Flow
Create_Child_case_for_Breakdown Flow
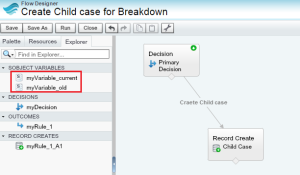
CREATE_CHILD_CASE_FOR_BREAKDOWN FLOW
7. To check Workflow action, use this URL https://gs0.salesforce.com/09M, change the Salesforce instance, as per your current organization instance. I have created a custom view to see additional details
Workflow action to call a Flow
WORKFLOW ACTION TO CALL A FLOW
8. If you click on the Edit link, it will look like the following screenshot
Edit action Flow param
EDIT ACTION FLOW PARAM
Note : – This is my finding and only for learning purpose. Don’t delete any actions or Flows.